
Indoor Seed-Starting Artificial
Light Set-Up
Many garden clubs enjoy starting
their plants from seed. It's a huge cost savings and a very satisfying
endeavor. Most gardeners set aside a little space in their basements every late
winter / early spring. You don't need anything fancy! The main thing you have
to provide is artificial light for the two months or so that you will start
seeds indoors before outdoor planting time.
See
articles in the Seeds, Bulbs and Start-Ups section on this website for other grow-light
ideas, if this one is too difficult for your building skill level. You can buy
a tabletop growlight and stand from a garden center, but it will only serve a
few dozen seeds at a cost of $100 or so.
Or you can build your own, from PVC
pipe:
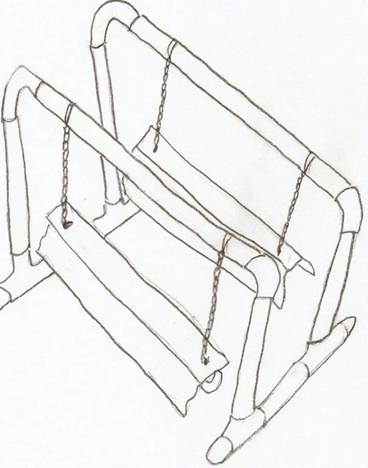
Sketch shows how the simple parts work together.
Here's
a cheaper way to create artificial light. You can obtain the "ingredients" for
this "recipe" from your local hardware store, or try garage sales for the shop
lights:
- Two 10-foot long, 1¼ " wide
sections of Schedule 40 PVC pipe
- Four 1¼ " PVC end caps
- Four 1¼ " T-shaped fittings
- Four 1¼ " rounded elbows
- Two 48" shop lights that can hold
two bulbs per fixture
- Four 48" fluorescent lamps
- About 6' of double-loop chain
(though some shop lights come with chain included, so check)
- Four small S hooks
- Scrap wire
- Power strip with grounded outlets
- Timer
- 320-grit sandpaper
- Pliers
Cut the PVC pipe into two 52"
support rails, four 20" legs, four 2" couplers, and two 12" spacers. Sand edges
with sandpaper.
Attach one T fitting a few inches in
from t the end of each spacer. The spacers will rest on the table at either
end.
Into the open ends of each T
fitting, insert a coupler and then a PVC camp.
Insert a 20" leg into the middle
hole of each T fitting. These are the vertical legs.
Attach a rounded elbow to all four
tops of your legs.
Connect both ends of the 52" support
rails into the open ends of the four elbows.
Voila! It should stand up securely
now!
With pliers, close up one end of an
S hook, then wire it to one of the top rails near the corners. Repeat for the
other three corners.
Hang the shop light fixtures from
the stand with the double-loop chain, hooking the chain links onto the open end
of the S hooks.
Install the fluorescent lamps, and
make sure they work.
Use the chains to lower and raise
the bulbs so that they are 3" to 4" above your seedlings as they grow.
Use the timer to set up your
light/dark cycles. Some people prefer 12 hours of light and 12 hours of
darkness; others prefer 14-hour light "days" and 8 hours of darkness.
The trick is to start seeds of
plants that tend to grow at about the same rate, so that you don't have some
plants that are two inches tall at six weeks, and others that are 10 inches
tall by that time. If that happens, it will be impossible to keep the lights
3-4" above the plants since they will be at such different heights.
If
it's not possible to coordinate plant heights like that, you might have to
build two sets of artificial lights.
Your
plant light stand is useful year-round, if you have the space. After you've set
out your garden plants for the summer, you can use your system to grow alfalfa
sprouts for salads and sandwiches. You can also use it to get a good head start
on your fall crops, such as the second round of lettuce and spinach, to be
transplanted in the garden in late summer.