
Indoor Seed-Starting:
A How-To Checklist
See the next few
articles in this category
for specifics on indoor lights, plant
selection, and transplanting.
Supplies:
Seeds |
trays or other containers | bucket and bleach
Soilless
seed-starting growing mix | ruler | pencil
Small
craft sticks or plastic labels, or cut free labels from yogurt cups |
waterproof pen
Distilled
or dechlorinated water
Water
sprayer (a carefully washed-out window cleaner spray bottle will do)
Plastic
wrap | watering can with a "rose" nozzle
Indoor light
system | space heater | oscillating fan
Plant
fertilizer specially made for seedlings
It is fun to grow your own plants
from seed to harvest. Starting plants from seed is cheaper than buying
seedlings at the store. There also are many more seed varieties to choose from
than you can typically buy in a store. You can grow higher-quality plants, fit
your own planting schedule, and take pride in your growing skills!
There are a few start-up expenses
that will make your first year as an indoor grower more expensive, but you
should make up the cost by the end of the year as your harvest comes in.
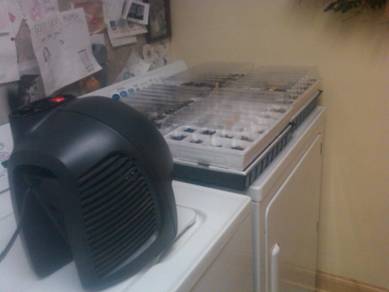
Before seeds germinate,
keep them warm on a dryer;
run a load a few times to
warm the flats.
A space heater is also a big help.
Some kids' garden clubs just have
one seed-starting location, and others ask several families with kids in the
club to grow a "flat" (tray containing, typically, 36 seedlings) or two, in
order to spread out the responsibilities.
Follow
this checklist to get started:
§ Set aside
a table or counter space in your home that you can dedicate to seed-starting in
the late winter and early spring for two months or so. Depending on how much
space you have, decide how many seeds you are going to start, and in what
containers.
§ Select
plants that can be started from seed indoors weeks before the last freeze in
your area. Use the backs of seed packets and other resources.
§ Order
those seeds from catalogs or purchase them in a local store.
§ Determine
the date of the last expected freeze in your area. Call your local county
extension office if you are not sure. Then schedule Planting Day.
§ Make a
sowing and transplant calendar so that the seedlings are the right size when it
is time to transplant them. Some seeds should be started eight weeks ahead of
Planting Day; others just four weeks ahead, and a few just two weeks ahead.
§ Decide
whether you have good enough light from a large window, facing south, that lets
natural light in very well, or (as most people find) you have to set up an
indoor light system, probably on a table. You can set it up next to a window
for the best of both worlds, or in your basement out of the way.
§ Set up a
lighting system. A typical solution is shoplights with fixtures that have two
4-foot tubes, arranged on adjustable chains hanging from an overhead pipe or
hooks in the ceiling, or some other support that is above the table surface,
with a timer to give the plants 12-14 hours of light per day. You may need more
than one shoplight, if you want to start a lot of seeds. Compare the length and
width of your seed-starting containers to the length and width of your light
source, to determine your needs.
§ Determine
the date of the last expected freeze in your area. Call your local county
extension office if you are not sure. Then schedule Planting Day.
§ Make a
sowing and transplant calendar so that the seedlings are the right size when it
is time to transplant them. A few plants, such as celery and leeks, need to be
started from seed 12 weeks before being transplanted outside. Some seeds should
be started eight weeks ahead of Planting Day; others just four weeks ahead, and
a few just two weeks ahead.
§ Punch
drainage holes in the bottom of any container, such as yogurt cups, cottage
cheese containers, cut-off plastic soda bottles, tall milk cartons, foam cups
or plastic pots, with an ice pix or a hammer and nail. Wood, plastic and clay
pots are fine, but make sure there are drainage holes. You can also buy
self-watering seed-starting kits that water from the bottom, and those are a
good convenience. When made of Styrofoam, they are insulated and therefore
afford excellent protection against wide temperature swings.
§ Sterilize
planting containers, and the trays that go under them to catch excess water
later, with a solution that is nine parts water, one part bleach. This is to
prevent infection from bacteria and fungus that can kill all your seedlings
before they even get going. It's called "damping off." You don't want it! Rinse
well under running water and let air dry.
§ Buy
soilless growing mix - NOT regular garden soil or even potting soil. You need specially-prepared
seed-starting mix available in garden stores. This is also a defense against
damping off, because this soilless mix is sterile. A good seed-starting mix has
spaghnum moss (dehydrated bog plant that can soak up more water than a sponge),
perlite (made from lava rock and is a good soil aerator and water retainer) and
vermiculite (little bits of mica rock that retain water and also soak up
fertilizer for later release to the roots as it dries) to enable root growth.
§ To save
money, you can mix your own seed-starting soil with 40% milled sphagnum peat moss,
50% vermiculite and 10% perlite. You can use garden soil or compost, but is
essential that you pasteurize it - kill bacteria and fungus. Place the mixture on
a cookie sheet and place in a preheated, 180-degree oven. Leave it in at that
temperature for 30 minutes. This will eliminate any disease organisms
present. One note though: it might smell bad for a while.
§ In a
plastic bag, add warm distilled or dechlorinated water to your soilless growing
mix until it is moist but not muddy. Use your hand or a spoon, and keep the bag
mostly closed as you stir, to prevent the dust from getting out. The sodium in
softened water could kill your seedlings, and chlorine could, too. To
dechlorinate water, simply turn on your tap for a minute and let most of the
chlorine run down the drain, then fill your spray mister or watering can and
let it sit overnight.
§ It's a
good idea to wash your hands with warm water and soap before and after this
process. Many seeds are coated with a fungicide; your seed packet should tell
you. You wouldn't want to be on your hands for long. You also might want to
wear rubber gloves, especially if you have any cuts or scratches on your hands
or wrists that germs from the dirt might enter into.
§ Place
water-catching trays on your table or counter. Place your containers on the
trays. Place the moist soilless growing mix into the containers. Fill them to
within ½ inch of the top on the sides, mounded even with the top in the center.
This promotes good air circulation, discouraging disease. Push down gently with
the end of a ruler to "tamp" in.
§ Have your
plant labels and waterproof pen ready to go. It is important to label each row
or container because many seedlings look alike and you may switch them around
later on. Label them as soon as the seeds are in.
§ Your club
should have a Garden Notebook and now is the time to record the type of plant,
the variety (or name of the particular plant), how many seeds, and the date.
You can come back later and record how many seeds germinated, and later, how
many plants you transplanted outside and what date. Then you can easily figure
out when your harvest is going to be!
§ A few
days before, check your seed packets to see if any seeds need to be refrigerated,
soaked in water, or nicked with a sharp knife, to hasten germination.
Sometimes, these steps should be taken a few or several days in advance, so be
aware.
§ If you
are growing seeds in a "flat" - a shallow plastic, wood or even cardboard tray,
pot or box with just one big opening -- use the ruler to "draw" a long, shallow
rut - a "furrow" -- down the "flat" in two or three lines. It should only be
one-fourth inch to one-half inch deep. Then lay the ruler on its side along the
furrow so you can see the inch marks.
§ Tweezers
are a good solution for handling small seeds.
§ Sow small
seeds such as petunias, snapdragons and flowering tobacco at five to eight
seeds per inch if you're planning to transplant them into larger individual
containers once they have gotten started. Typically, you would do this for
tomatoes and peppers, for example. Many smaller plants, such as lettuce, are
fine in the same container because they don't get too big before transplant
time.
§ Sow
larger seeds, such as melons, at three to four seeds per inch. Note that squash
and melons have sensitive roots, so start them in their own containers, not
flats, and keep them there until they are transplanted just once, straight into
the garden.
§ Sow fewer
seeds, perhaps three or four per inch, if you intend to keep the seedlings in
that same container until planting time. You can come back in and snip off
unwanted seedlings later, if they all come up. This is called "thinning."
§ Sow seeds
in the same flat if they all need light to germinate. Read the seed packets to
determine these. Usually, this is true for seeds that are very tiny (i.e.
petunias, lobelia, coleus and ageratum).
§ For other
seeds, lightly sprinkle soilless mix on top of the seeds to cover, just barely.
Try to cover with no more than three times the diameter of the seed. Remember
to label each row or individual container!
§ If you
are growing seeds in individual "cells" or containers (peat pots, yogurt cups,
toilet-paper tubes, etc.) - poke shallow holes (one-fourth inch to one-half
inch) in the soilless mix with a pencil, put two to four seeds in each
container, cover lightly with more soilless mix, and later, thin all but the
strongest one.
§ Always
save your seed packets for future reference. A plastic pocket for your Garden
Notebook is a good idea to store them.
§ Cover
with the clear plastic cover if provided in a seed-starting set, or with clear
plastic wrap, or glass, until you can see green seedlings. You can poke plastic
forks in, here and there, to hold the plastic up a little. If the seed packet
doesn't say the seeds need light to germinate, put them in a dark, warm place. Check
daily! When you see the sprouts, remove the plastic or glass. Some
plant-starting "systems" have a plastic greenhouse top that you can leave on,
to keep humidity high.
§ If mold
begins to grow on your soilless mix, it is too wet. Scrape away and discard the
mold, and take the plastic off for a day to let air get to the soil. Then
replace the plastic.
§ Put your
containers someplace warm during the germination phase. Warmth speeds up
germination. The key is warm enough soil, not necessarily warm enough air. Good
options: on top of your dryer, on top of the refrigerator, on top of a big TV,
or near your furnace. Temps of around 78 degrees are best for most plants, but
check the back of your seed packets; a few need 85 degrees! You can buy a heat
mat if necessary to keep the soilless mix at a warm enough temperature for these
seed types. A space heater is also a good bet.
§ Don't
water or mist until the seeds germinate. You don't want them to rot in soil
that is too wet. That's as bad as soil that's too cold. You should see water
droplets on the inside of the plastic wrap. Soil that is too damp causes
"damping off" - all of your baby plants suddenly die.
§ Ironically,
most seedlings like cooler soil as they grow. So try to keep the temperature at
60 to 65 degrees, with 75 degrees as the maximum, where your seedlings are growing.
A few seeds, such as beans, prefer hotter soil, so check your seed packet or
gardening book.
§ Remember
to check daily! If plants grow too long after germination without proper light,
it can literally handicap them and they'll never grow properly.
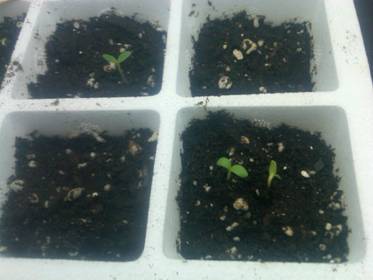
We have germination! Bachelor's buttons sprouted in just 3 days.
§ When you
can see green baby plants, it's time to remove the plastic or glass and move
your containers to that sunny window, if you have it, or under your light
source. If your seedlings are next to a window and it's cold at night, place a
blanket between the plants and the glass, or move them away from the window at
night.
§ Even the
sunniest of windows can't usually give seedlings quite enough light. Seedlings
tend to be leggy and weak. If you can't rig up indoor electric lights, you can
still beef up the amount of available light coming through the window. Simply
cover cardboard with foil and prop it behind your plants, so that the light
coming in through the window is reflected back onto the plants and not into the
room.
§ Use a
timer, or be vigilant, to keep the lights on long enough and give your plants
14 to 16 hours of light a day. They do need rest each day, but if you don't
give them enough time under the lights, they will be straggly and weak.
§ If you
are growing under a light source, keep the bulbs no more than two or three inches
above the seedlings as they grow upward. Use the adjustable chains to gradually
move the light source up as the seedlings grow taller. It's just another reason
to check your plants daily - you wouldn't want them damaged by touching the
light source!
§ The first
two leaves you will see are "cotyledons" (kot tle EE dons, food sources for the
plant embryo, the symbol of the transition from seed to plant). When plants have
put out their first true set of leaves, which will appear after the cotyledons,
and are an inch or two tall, you can transfer them carefully to individual
containers (usually 2" x 2") if you would like to, but don't handle them by
their tender stems! You can use a spoon to dig them up with a "rootball" so
that you never touch the plant parts at all while transplanting.
§ At this
point, if you are going to leave the seedlings in the shallow flats, and too
many seeds have come up, you need to thin them by snipping away excess plants a
the soil line. Snip away any plants that are shaped funny or look weak.
§ Once your
seedlings have appeared, stop misting, and water with a watering can,
preferably one with a long, narrow spout. Try not to get water on the leaves;
just water onto the soil around each seedling. Remember, just keep the mix
moist, not wet.
§ It's
probably a good idea to transplant all plants from flats to individual
containers (sterilized yogurt cups? store-bought plastic flats with multiple cells?
square 3" or 4" pots?) after three or four weeks. The more room for the roots,
the better. It's very hard to separate their roots and shoots if you leave them
crowded together for too long. It's also hard to separate them if their
soilless mix is too moist.
§ Transplant
tomatoes and peppers to a larger, 4" individual container when the seedlings
are three times as tall as the container they are in now. Use your fingers or
two spoons or forks to scoop up the rootball, or a small spoon. Try your best
not to touch the plant itself, especially being careful not to bruise or break
the stem. Always transplant tomatoes deeper than they were growing before, and
remove any leaves on the stem that's now going under the soil. This is to
encourage new root growth along the now-buried stem.
§ If you're
using a shallow flat that's two inches deep, transplant before the tomato and
pepper seedlings are six inches tall. You do this so you don't stunt their
growth. The larger the growing space available to roots, the larger the
seedlings will become. There is a special transplant mix for this purpose, or
you can use finely-sifted compost. By the time seedlings are six weeks old or
so, they can fight off any bacteria or fungus that they would have succumbed to
in the early going.
§ Later,
you may want to transplant your tomatoes one more time, to gallon pots, if you
have enough light to keep them going.
§ For all
new seedlings: after the true leaves are up, let the soil dry out slightly
between watering. Water early in the morning so the leaves can dry off and
avoid diseases. Water with lukewarm water in a spray-bottle or mister until
your seedlings are sturdy. Then you can switch to a watering can with a rose
nozzle - a many-holed sprinkler head. Water enough so that a little water runs
out the drainage holes in the bottom of the container. But the container should
never sit in water. Your roots need air to grow well, and soggy soil keeps air
from the roots.
§ Judge
whether your soil is too dry by picking up the tray. If it feels too light,
water slightly. You can also poke your finger in about an inch down, without
disturbing the roots, and bring up a little soil to examine for how moist it
is.
§ To make
sure the water is getting to the soilless mix at the bottom of each container,
you can occasionally set the containers in the waterproof tray and let them
soak up water from the bottom. Drain well - do not let them stay in standing
water for long. This way, roots will stretch and grow toward the bottom of the
pot and you'll get what you want - a nice, fat rootball supporting a healthy,
sturdy seedling.
§ Don't
fertilize 'til the plant's true leaves have appeared. Then fertilize once a
week at one quarter strength, or half-strength. That is highly diluted in
water. Full strength might burn or kill your baby plants. Note that most
commercial seed-starting mixes have fertilizer in them, so you don't want to
overdo in the early going. If you notice a crystalline crust on your soil,
you're over-fertilizing. Many gardeners swear by fish emulsion, or
fish-and-seawood liquid fertilizer. If your plants seem to be growing too fast,
switch to fertilizing every other week. Don't fertilizer the last week before
setting plants outside so they will have reserved strength for the
transplantation process.
§ Insufficient
light isn't the only reason a seedling started indoors might be weak, spindly
and unable to support itself. It hasn't had the natural pressure of wind and
rain to make itself strong. So once your seedlings are up and growing, set up a
small oscillating fan near the seedlings so that they "learn" to sway in the
breeze and stand up straight. Run the fan just a couple of hours a day, and
your seedlings will be stronger.
§ If your house's humidity level is too high - over
50% -- and if you don't have a fan on your seedlings, you are asking for
trouble in the form of soil fungus and plant disease. You might put a layer of
clean gravel or small stones in the waterproof tray under your containers to
drain moisture farther away from your plant containers. And don't forget that
fan for air circulation!
§ If mold
starts to grow on your soil, your soil is too wet. Scrape off and discard the
mold and don't water for a few days. Your seedlings won't be hurt.
§ Get your
seedlings ready to be transplanted outside by gradually exposing them to the
outdoors a week before. This is called "hardening off." Leave them outside on a
covered porch or under a shade tree for an hour a day, gradually adding a
hour's exposure per day. Make sure they can't be damaged by wind and hot sun.
§ Transplant
on an overcast or drizzly day with calm winds. If it's raining, don't water the
first day, but do water the next day. Don't panic if a few plants, including
cabbage, look like they've died after transplanting; be patient, and they'll
spring back to life.